¶ DEVELOPMENT
¶ Why Kubernetes
A large scale Laravel application needs a few different services to operate properly. Kubernetes allows us to horizontally scale each of the services. We can achieve massive scale without any code changes while maintaining full control over our infrastructure.
Your infrastructure is stored in code allowing it to be easily upgraded or recreated.
¶ How to install a development setup
We’ll start out by learning how to run a miniature cluster on our own computer. Then we’ll move to a production setup using a cloud provider.
First you’ll need to install docker for working with containers. Docker includes a container runtime and tools to build containers. Head over to https://www.docker.com and install the latest stable version.
Next, install Minikube. Minikube is a development focused Kubernetes cluster that you can run locally. It’s not production ready but it’s perfect for learning and testing. Available here:https://minikube.sigs.k8s.io.
After installing, start it with:
% minikube start --vm=true
And finally in stall kubectl. Kubectl is a command line tool that allows you to interact with a Kubernetes cluster. You’ll use it in production and development. A cluster and the authentication details needed to access it are collectively known as a context.
After installing kubectl, try running
kubectl config get-contexts
You should see your minikube cluster.
% kubectl config get-contexts
CURRENT   NAME                                 CLUSTER                              AUTHINFO                                   NAMESPACE
          do-nyc1-kubernetes-for-laravel       do-nyc1-kubernetes-for-laravel       do-nyc1-kubernetes-for-laravel-admin
          do-nyc1-new-kubernetes-for-laravel   do-nyc1-new-kubernetes-for-laravel   do-nyc1-new-kubernetes-for-laravel-admin   kubernetes-for-laravel
          docker-desktop                       docker-desktop                       docker-desktop
*         minikube                             minikube                             minikube                                   default
¶ Building a basic container
I prepared a very basic nginx docker image available here.
The 3 files are Dockerfile, nginx.conf, and index.html :
- Dockerfile contains the instructions for Docker to build the image.
FROM nginx:1.21.0
RUN rm -rf /etc/nginx/conf.d/default.conf
ADD index.html /var/www/html/index.html
ADD nginx.conf /etc/nginx/conf.d/nginx.conf
- The nginx.conf has a basic configuration to serve the index.html
server {
      index index.php index.html;
      error_log  /var/log/nginx/error.log;
      access_log /var/log/nginx/access.log;
      root /var/www/html;
    }
- The index.html is the content that will be displayed.
<!DOCTYPE html>
<html lang="en">
<head>
    <meta charset="UTF-8">
    <title>Hello Kubernetes</title>
</head>
<body>
Hello from Kubernetes.
<br>
This is nginx serving a static asset.
</body>
</html>
cd into the directory then run:
$ docker build . --tag=basic-nginx’
This builds then publishes the container to our local Docker repository.
$ cd basic
$ docker build . --tag=basic-nginx
[+] Building 0.1s (9/9) FINISHED
 => [internal] load build definition from Dockerfile                               0.0s
 => => transferring dockerfile: 37B                                                0.0s
 => [internal] load .dockerignore                                                  0.0s
 => => transferring context: 2B                                                    0.0s
 => [internal] load metadata for docker.io/library/nginx:1.21.0                    0.0s
 => [1/4] FROM docker.io/library/nginx:1.21.0                                      0.0s
 => [internal] load build context                                                  0.0s
 => => transferring context: 62B                                                   0.0s
 => CACHED [2/4] RUN rm -rf /etc/nginx/conf.d/default.conf                         0.0s
 => CACHED [3/4] ADD index.html /var/www/html/index.html                           0.0s
 => CACHED [4/4] ADD nginx.conf /etc/nginx/conf.d/nginx.conf                       0.0s
 => exporting to image                                                             0.0s
 => => exporting layers                                                            0.0s
 => => writing image sha256:25761eda3f1b1c346a56b06ba0c48929c25accdc               0.0s
 => => naming to docker.io/library/basic-nginx                                     0.0s
$
Next run to start the container :
docker run -p 8787:80 basic-nginx
Direct your browser to http://localhost:8787 to see the output of index.html.
We’ve successfully built and run a container in docker, next we’ll run it on Kubernetes.
¶ Running the container in Kubernetes
Now to run the container in Kubernetes, we’ll start to touch the surface of infrastructure as code.
We need to create a deployment file which instructs Kubernetes on how to run our application.
apiVersion: apps/v1
kind: Deployment
metadata:
  name: nginx-basic
  labels:
    tier: backend
spec:
  replicas: 1
  selector:
    matchLabels:
      app: nginx
      tier: backend
  template:
    metadata:
      labels:
        app: nginx
        tier: backend
    spec:
      containers:
        - name: nginx
          image: basic-nginx
          imagePullPolicy: Never
          ports:
            - containerPort: 80
The important parts are the image name which needs to match the tag we gave in docker build, the imagePullPolicy, and the selector: matchLabels which will be used for networking later.
imagePullPolicy: Never tells Kubernetes that the image exists locally, i.e. not on Docker hub.
Run to create the deployment :
kubectl apply -f basic_deployment.yaml
You should see a message that the deployment was created.
Start the Minikube dashboard by running minikube dashboard. That will open your browser to the Kubernetes dashboard.
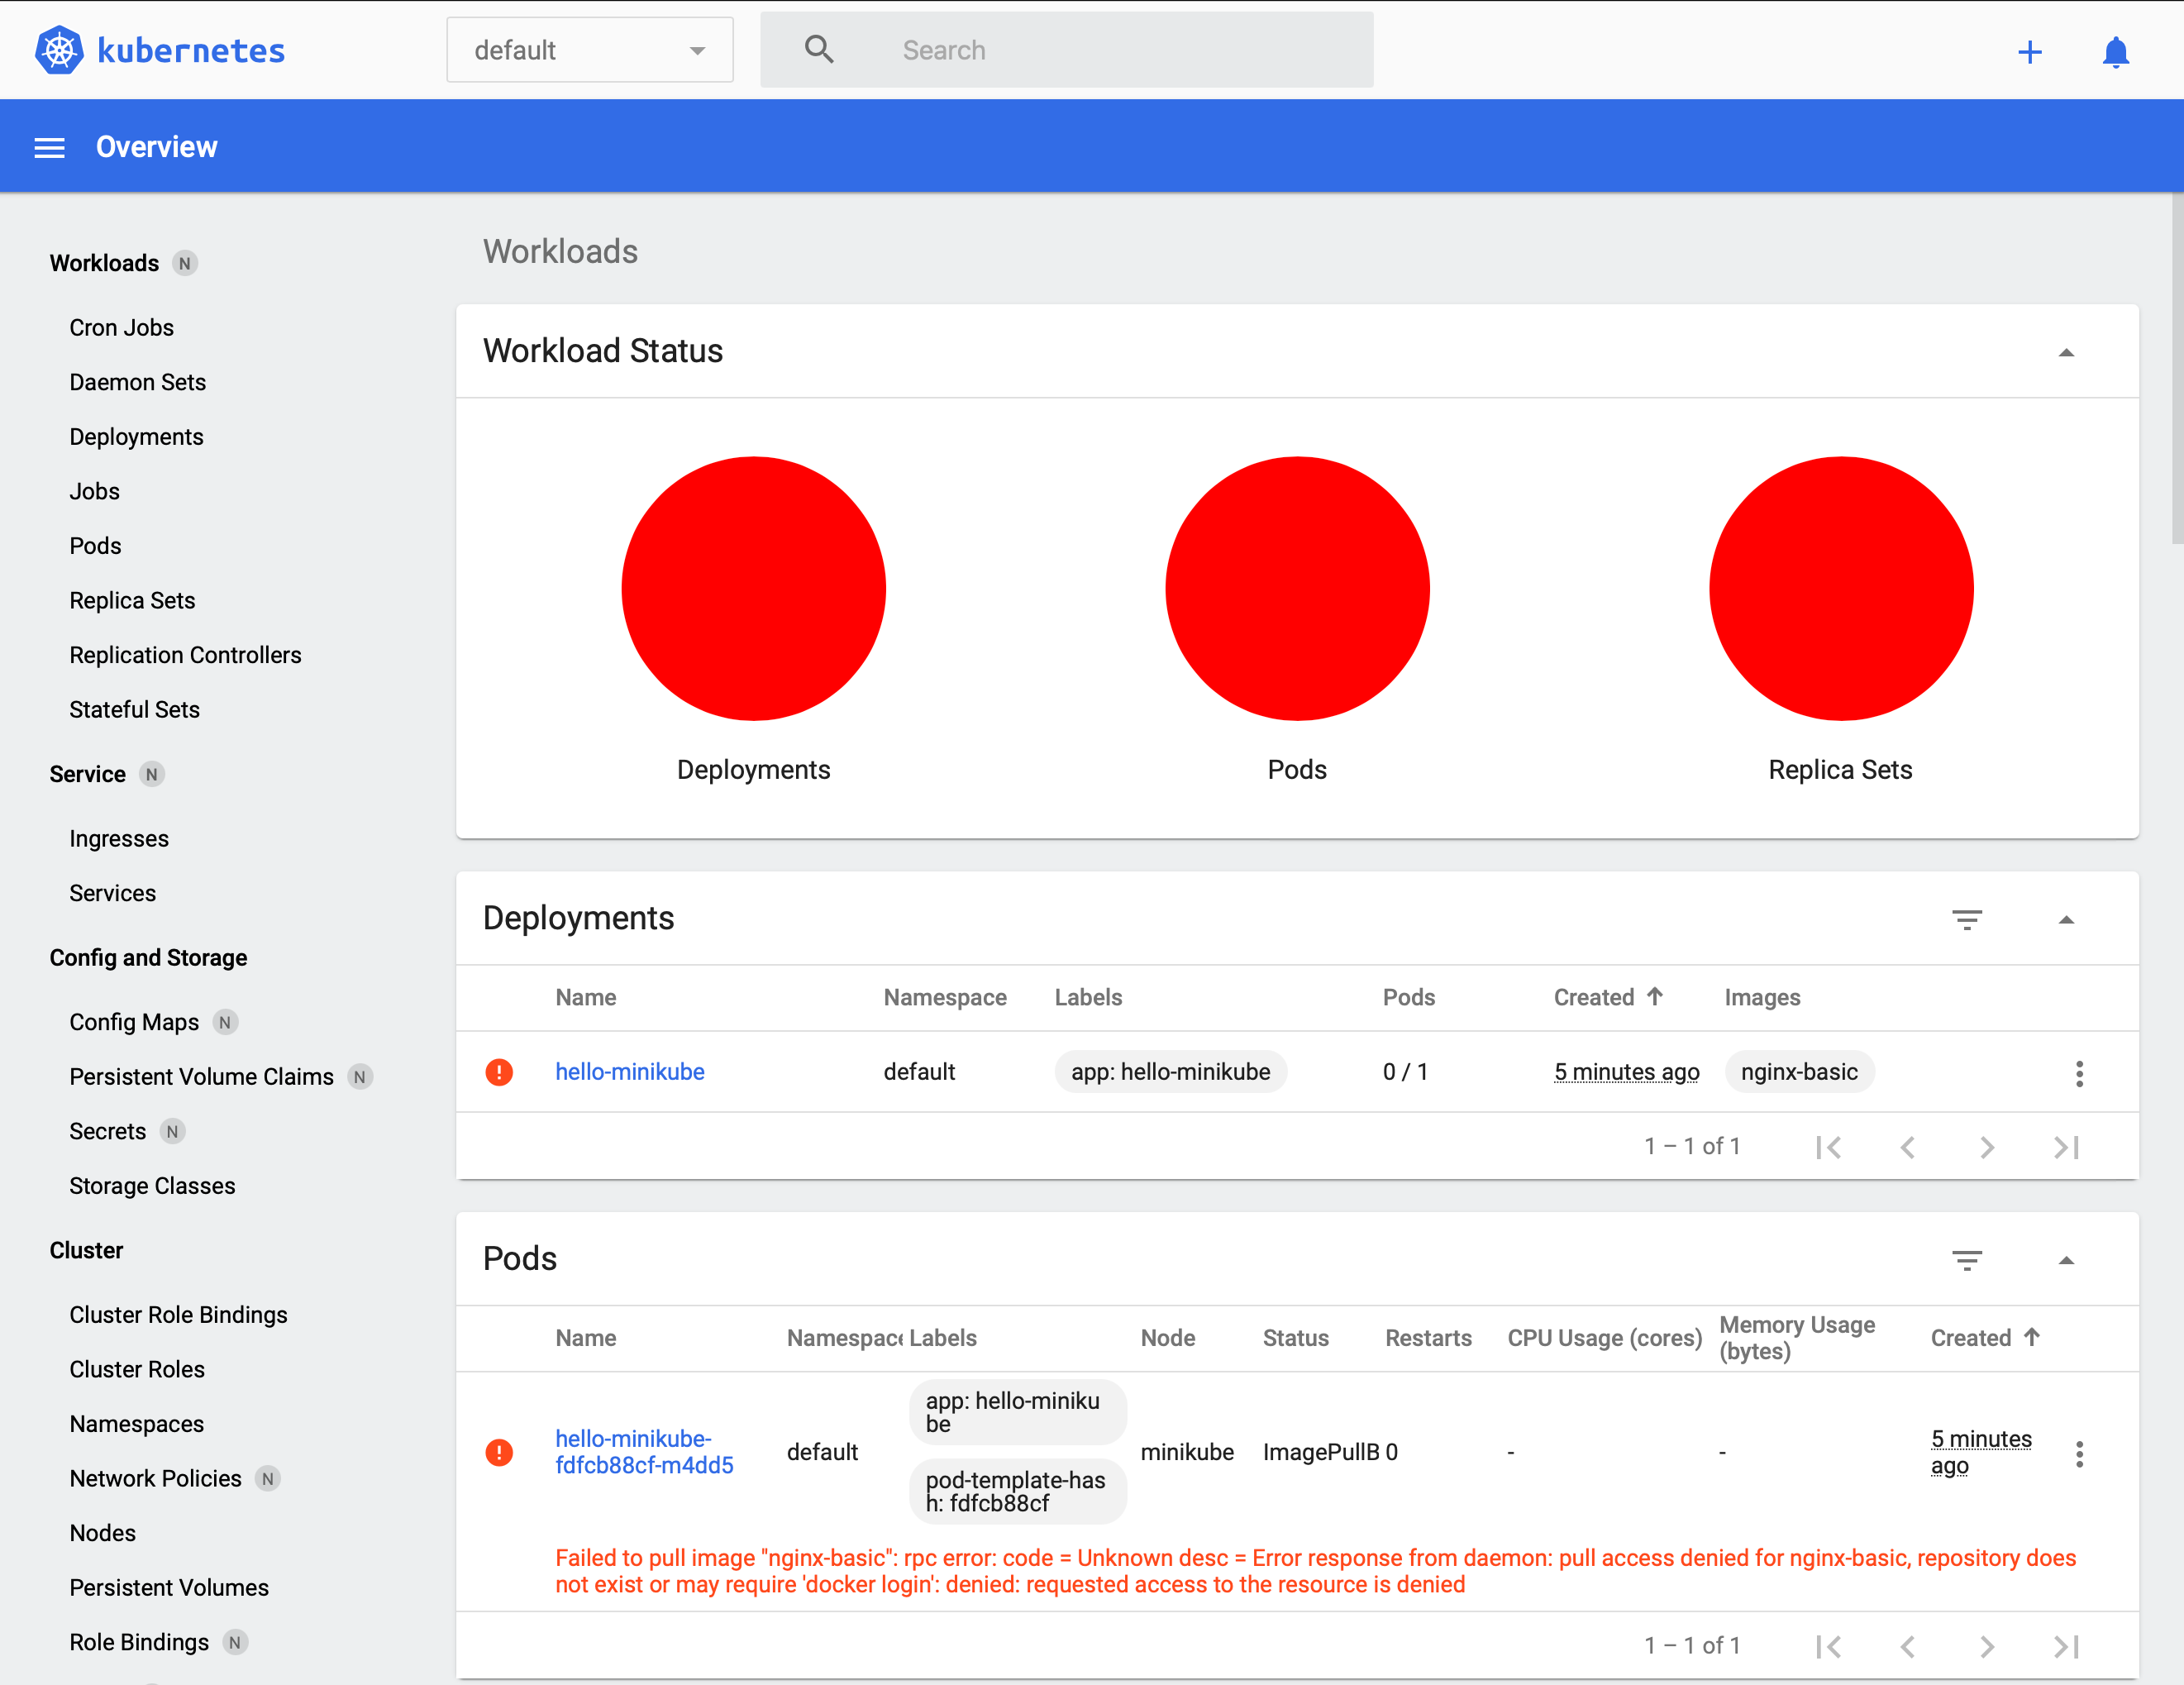
Everything is red, this doesn't look good. Click one of the small red dots to reveal the message about what went wrong.
Failed to pull image "nginx-basic": rpc error: code = Unknown desc = Error response from daemon: pull access denied for nginx-basic, repository does not exist or may require 'docker login': denied: requested access to the resource is denied
This message is a little deceptive, access wasn't actually denied, the image doesn't exist in Minikube’s Docker repository. That’s right, Minikube runs its own Docker.
So how do we get our image in there? We have to switch our command line’s environment to access Minikube's docker. Run :
eval $(minikube -p minikube docker-env)
Now we can build our image with :
docker build . --tag=basic-nginx
Since we’ve switched docker environments, now it’ll be available to Kubernetes.
Delete the old deployment then run the same deploy command again. We should have all green lights in the Kubernetes dashboard now.
¶ Accessing the container
Our container is running but we need to create a service and an ingress to be able to access it. We’re building from the ground up, so we’ll start with services.
¶ Service
A service is how we expose a set of pods to the network.
apiVersion: v1
kind: Service
metadata:
  name: nginx
  labels:
    tier: backend
spec:
  selector:
    app: nginx
    tier: backend
  ports:
    - protocol: TCP
      port: 80
The service knows where to route by matching its selector to the deployment’s matchLabels.
In this example, the port routes traffic internally to the same port it exposes externally. Different routing configurations are possible but this is all we’ll need.
Deploy the service by running :
kubectl apply -f nginx_service.yaml
¶ Ingress
An ingress is how traffic gets from the outside world into the Kubernetes cluster.
First we need to enable an ingress controller. Cloud services have their own controllers but in development we’ll use a simple nginx ingress controller.
Install it by running
minikube addon enable ingress
Now we can create the ingress resource :
apiVersion: networking.k8s.io/v1
kind: Ingress
metadata:
  name: ingress
  annotations:
    nginx.ingress.kubernetes.io/rewrite-target: /
spec:
  rules:
    - http:
        paths:
          - path: /
            pathType: Prefix
            backend:
              service:
                name: nginx
                port:
                  number: 80
The rules match the request so different requests can be routed to different services. We’re matching all requests prefixed with "/" and routing them to our service named ‘nginx’.
Deploy the ingress by running
kubectl apply -f ingress.yaml
Wait until our ingress is ready with an endpoint ip address. It can take a couple of minutes.
Run :
kubectl get ingress
and when an address is shown, navigate to that IP to view the output from the container.
NAME      CLASS    HOSTS               ADDRESS              PORTS     AGE
ingress   <none>     *                 192.168.64.4        80, 443     2m
It can take over a minute for the address to be filled. If it doesn’t come up, something else is wrong. Join the Discord server and let’s figure it out!
You can delete deployment we created here. We’ll be creating a new one that can handle php. The service and ingress can be reused.
¶ Running Laravel
We’ve used Nginx to serve a static asset, now let’s use it to serve a php-fpm container.
Starting from the ground up, first we’ll create the php-fpm container then we’ll configure Nginx to serve static assets and direct php requests to the php-fpm container.
¶ Building Laravel
First create a new Laravel application and in the root of that directory, create a file called Dockerfile.
ARG PHP_EXTENSIONS="apcu bcmath pdo_mysql redis imagick gd"
FROM thecodingmachine/php:8.0-v4-fpm as php_base
ENV TEMPLATE_PHP_INI=production
#copy our laravel application to html
COPY --chown=docker:docker . /var/www/html
RUN composer install --quiet --optimize-autoloader --no-dev
FROM node:14 as node_dependencies
WORKDIR /var/www/html
ENV PUPPETEER_SKIP_CHROMIUM_DOWNLOAD=false
#bring in the laravel application from the php_base to our node js container
COPY --from=php_base /var/www/html /var/www/html
RUN npm set progress=false && \
    npm config set depth 0 && \
    npm install && \
    npm run prod && \
    rm -rf node_modules
FROM php_base
#bring the finished build back into the php container
COPY --from=node_dependencies --chown=docker:docker /var/www/html /var/www/html
Make sure your docker environment is set to Minikube as before.
Run :
docker build . --tag=laravel-php
from inside the Laravel project's directory with the new Dockerfile.
¶ Deploying Laravel
Nginx also needs access to the static assets from our Laravel application. We’ll create a shared volume that’s accessible to Nginx and php. On deployment, our Laravel php container will copy the static assets to the shared volume.
First we create the persistent volume claim.
apiVersion: v1
kind: PersistentVolumeClaim
metadata:
  name: code
spec:
  accessModes:
    - ReadWriteOnce
  resources:
    requests:
      storage: 1Gi
  storageClassName: standard
Deploy by running :
kubectl apply -f volume.yaml
The volume exists in the Minikube virtual machine. You can access it by running minikube ssh then cd/tmp/hostpath-provisioner/default.
Next include the shared volume into the deployment :
apiVersion: apps/v1
kind: Deployment
metadata:
  name: php
  labels:
    tier: backend
spec:
  replicas: 1
  selector:
    matchLabels:
      app: php
      tier: backend
  template:
    metadata:
      labels:
        app: php
        tier: backend
    spec:
      enableServiceLinks: false
      containers:
        - name: php
          image: laravel-php
          imagePullPolicy: Never
          volumeMounts:
            - name: code
              mountPath: /code
          lifecycle:
            postStart:
              exec:
                command: [ "/bin/sh", "-c", "cp -r /var/www/html/. /code" ]
      volumes:
        - name: code
          persistentVolumeClaim:
            claimName: code
Deploy by running :
kubectl apply -f php_deployment.yaml
We use a lifecycle command to copy the laravel application to the shared volume. Nginx will serve from the shared volume.
This strategy isn’t perfect because each time a pod is created, it copies the contents to the shared directory. This can cause unexpected downtime. Shared volumes are also problematic when using multiple nodes. We’ll solve that when we get into the production environment.
¶ Accessing Laravel
If you tried to access through the ingress’s endpoint, you will receive a 503 error. We still can’t access our application because php-fpm doesn’t know how to handle HTTP requests. For that we need an Nginx reverse proxy.
In our basic Nginx setup earlier, we used docker to build an image of Nginx with the configuration file added. This time we’ll add the config file in using Kubernetes. That allows us to more easily manage the configuration.
apiVersion: v1
kind: ConfigMap
metadata:
  name: nginx-config
  labels:
    tier: backend
data:
  config : |
    server {
      index index.php index.html;
      error_log  /var/log/nginx/error.log;
      access_log /var/log/nginx/access.log;
      root /code/public;
      add_header X-Frame-Options "SAMEORIGIN";
      add_header X-XSS-Protection "1; mode=block";
      add_header X-Content-Type-Options "nosniff";
      location / {
          try_files $uri $uri/ /index.php?$query_string;
      }
      location ~ \.php$ {
          try_files $uri =404;
          fastcgi_split_path_info ^(.+\.php)(/.+)$;
          fastcgi_pass php:9000;
          fastcgi_index index.php;
          include fastcgi_params;
          fastcgi_param SCRIPT_FILENAME $document_root$fastcgi_script_name;
          fastcgi_param PATH_INFO $fastcgi_path_info;
        }
    }
Pay attention to
fastcgi_pass php:9000;:
‘php’ references a named network location which we will create with a service.
Data is passed to it using port 9000.
Deploy by running :
kubectl apply -f nginx_configmap.yaml
apiVersion: v1
kind: Service
metadata:
  name: php
  labels:
    tier: backend
spec:
  selector:
    app: php
    tier: backend
  ports:
    - protocol: TCP
      port: 9000
We create a service named php which is referenced in the nginx_configmap.yaml and open port 9000.
Deploy by running :
kubectl apply -f php_service.yaml
The last thing we need to do is create the Nginx deployment with the configuration file and the shared volume.
apiVersion: apps/v1
kind: Deployment
metadata:
  name: nginx
  labels:
    tier: backend
spec:
  replicas: 1
  selector:
    matchLabels:
      app: nginx
      tier: backend
  template:
    metadata:
      labels:
        app: nginx
        tier: backend
    spec:
      volumes:
        - name: code
          persistentVolumeClaim:
            claimName: code
        - name: config
          configMap:
            name: nginx-config
            items:
              - key: config
                path: site.conf
      containers:
        - name: nginx
          image: nginx:1.21.0
          ports:
            - containerPort: 80
          volumeMounts:
            - name: code
              mountPath: /code
            - name: config
              mountPath: /etc/nginx/conf.d
Deploy by running :
kubectl apply -f nginx_deployment.yaml
Browse to the address given by the ingress and you should see the Laravel start page. That’s it for a very basic setup.
In the paid production guide, we’ll dig into a fully fledged production setup covering Redis, MySQL, Horizon, and Laravel’s scheduler. We’ll run CI/CD using Github Actions and a zero downtime deployment script.
Learn how to run and scale your site in production.
¶ PRODUCTION
¶ Setup and access the cluster
Create a cluster to your liking with at least 4GB of RAM. They are very easy to expand and upgrade later, that’s the beauty of Kubernetes. Using at least 2 nodes is recommended to prevent any downtime during cluster upgrades but you technically only need 1.
Go through the Digital Ocean getting started guide that will come up after creating the cluster. It shows you how add the context of the cluster to your local kubectl command line. You’ll administer the remote cluster just as you did the local one using kubectl.
On step 5, install the NGINX Ingress Controller.
After the cluster is ready, go to networking then load balancers and grab the external IP for the load balancer that was recently created.
Create an A record on your domain to direct traffic to the load balancer’s IP. We need a domain to setup SSL, or skip the SSL section. Browsing to the IP should return a 404 page.
¶ Namespacing
We can use a single cluster to run multiple projects with minimal risk of one problem bringing down unrelated services.
apiVersion: v1
kind: Namespace
metadata:
  name: kubernetes-for-laravel
  labels:
    tier: backend
Create a namespace by running
kubectl apply -f namespace.yaml
The metadata.name will be used on all of our files from here on.
Run the command to set kubectl’s default namespace :
kubectl config set-context --current --namespace=kubernetes-for-laravel
¶ SSL/TLS
With free certificates available, there’s little reason not to use HTTPS. We’ll use https://cert-manager.io to handle Let’s Encrypt certificates.
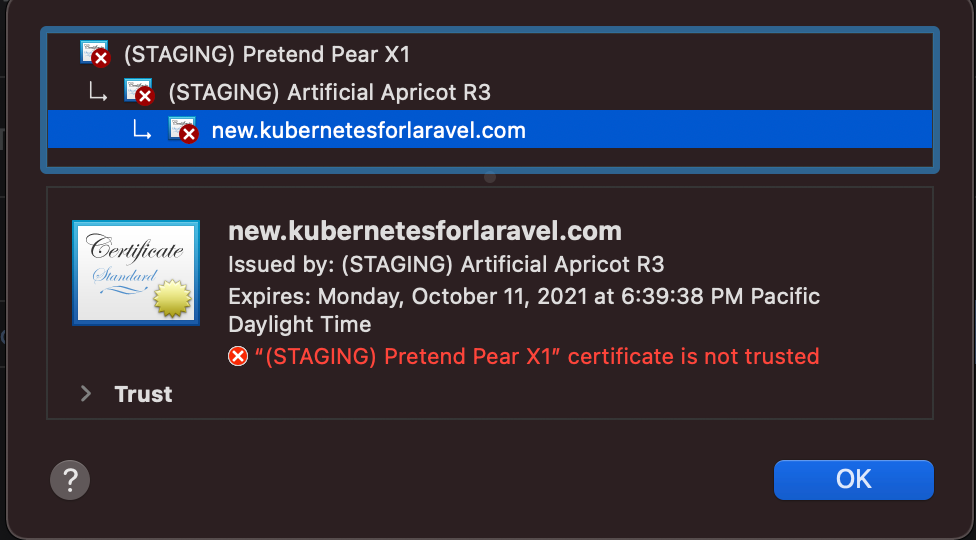
Before we start, let’s view the certificate that’s already installed.
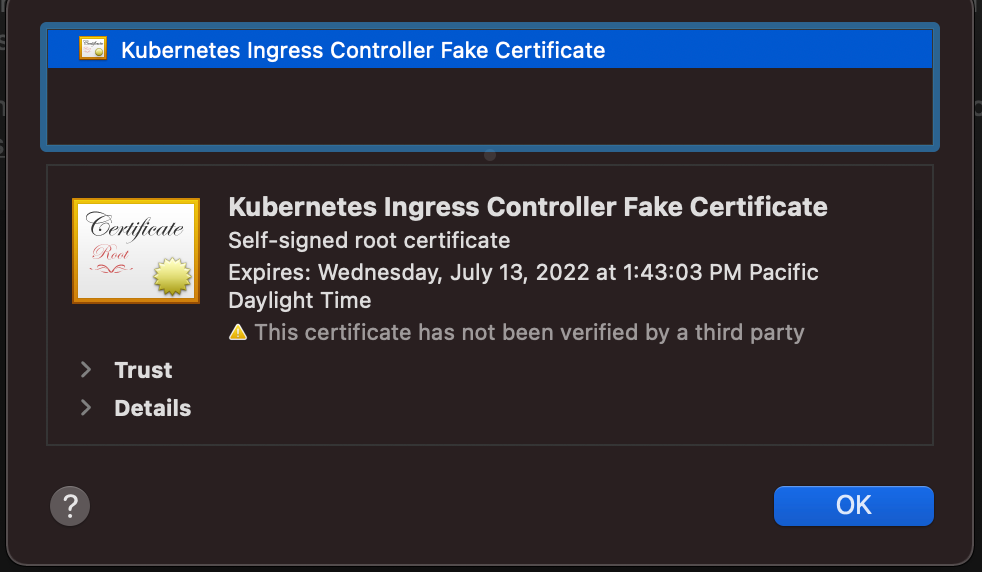
It’s a fake certificate so we need to replace that. Install the containers for it by running the two following commands:
kubectl apply -f https://github.com/jetstack/cert-manager/releases/download/v1.3.1/cert-manager.yaml
kubectl apply -f https://github.com/jetstack/cert-manager/releases/download/v1.3.1/cert-manager.crds.yaml █
Let’s Encrypt rate limits their production API so we’ll start out with the staging API then move over when we’re certain our configuration is correct. In the follower examples, you'll need to substitute your domain and your email address.
apiVersion: cert-manager.io/v1
kind: Issuer
metadata:
  name: letsencrypt-staging
  namespace: kubernetes-for-laravel
spec:
  acme:
    # Staging API
    server: https://acme-staging-v02.api.letsencrypt.org/directory
    email: admin@kubernetesforlaravel.com
    privateKeySecretRef:
      name: account-key-staging
    solvers:
      - http01:
          ingress:
            class: nginx
First apply the issuer:
kubectl apply -f lets_encrypt_issuer_staging.yaml
apiVersion: cert-manager.io/v1
kind: Certificate
metadata:
  name: kubernetes-for-laravel-staging
  namespace: kubernetes-for-laravel
spec:
  secretName: kfl-staging-certificate
  issuerRef:
    name: letsencrypt-staging
  dnsNames:
    - new.kubernetesforlaravel.com
Then apply the certificate:
kubectl apply -f lets_encrypt_certificate_staging.yaml
We need to create the ingress to use the certificate.
Run ‘Kubectl apply -f ingress_ssl.yaml
¶ Debugging
If your certificate is still showing as fake certificate, there’s some commands to run that will help figure out the status.
kubectl get certificaterequest
kubectl describe certificaterequest
kubectl get order
kubectl describe challenge
Requests are retried regularly so you don’t need to delete any objects to make cert-manager check again. The automatic retries are why we use the staging API.
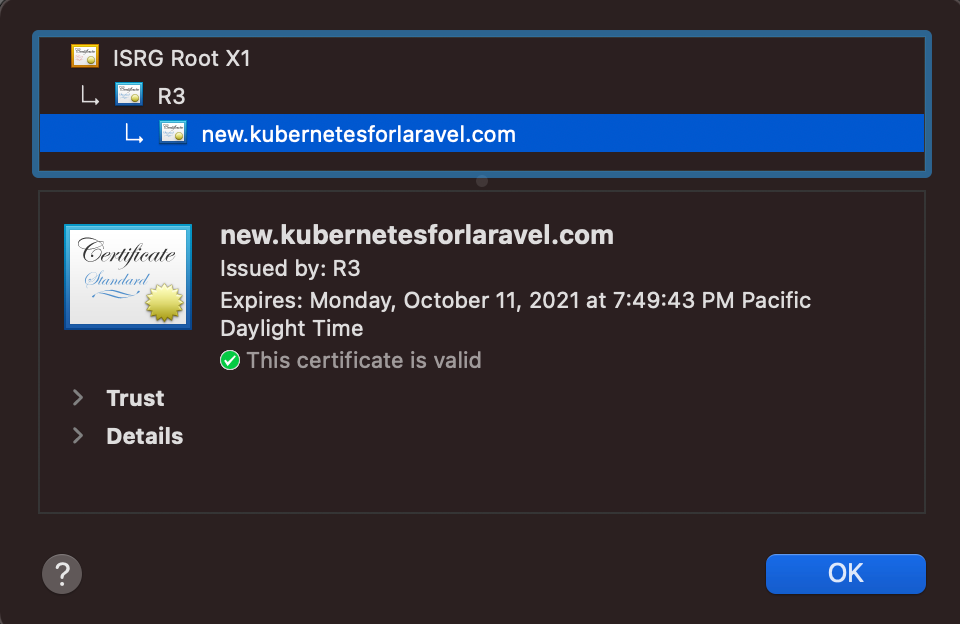
Some of these commands return a lot of information so be sure to scroll up. The last command is where you’re most likely to find the issue. There’s a bug in Digital Ocean that causes a routing issue but we can fix it easily.
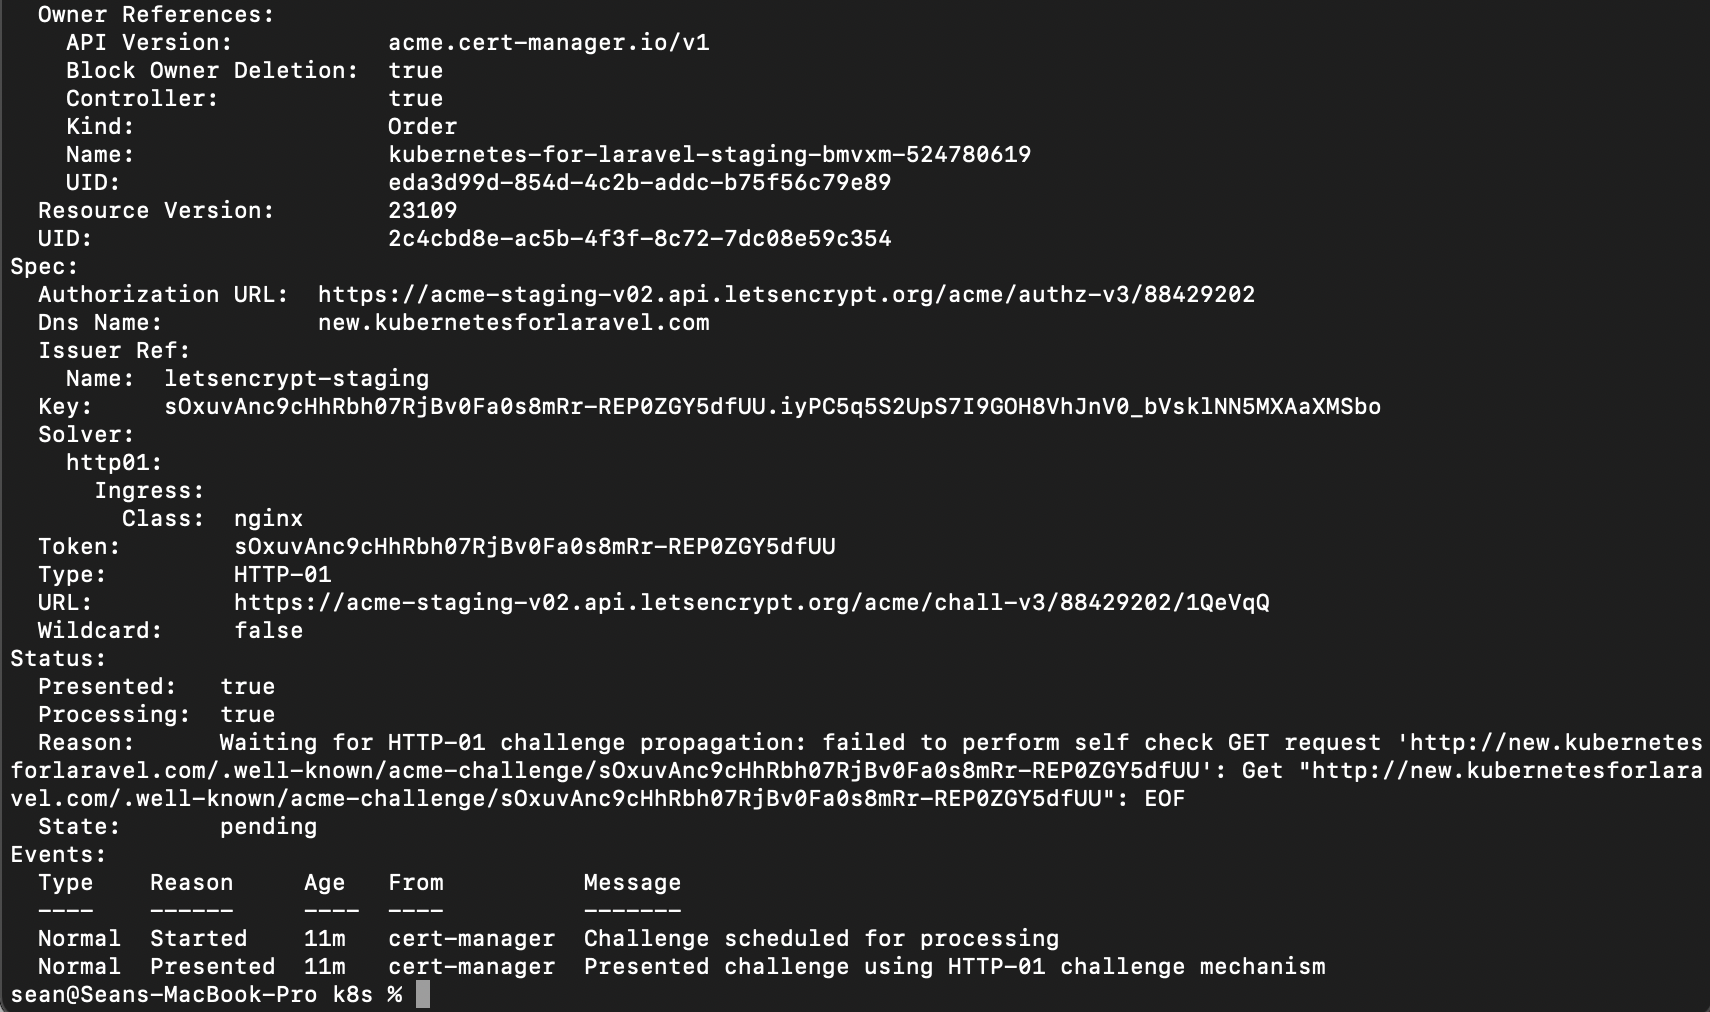
Run
kubectl describe challenge
If you get the message ‘Waiting for HTTP-01 challenge propagation: failed to perform self check GET request’ try visiting the URL from the message. If that URL loads, we just have to add an annotation to our Nginx Ingress Controller to aid in internal routing.
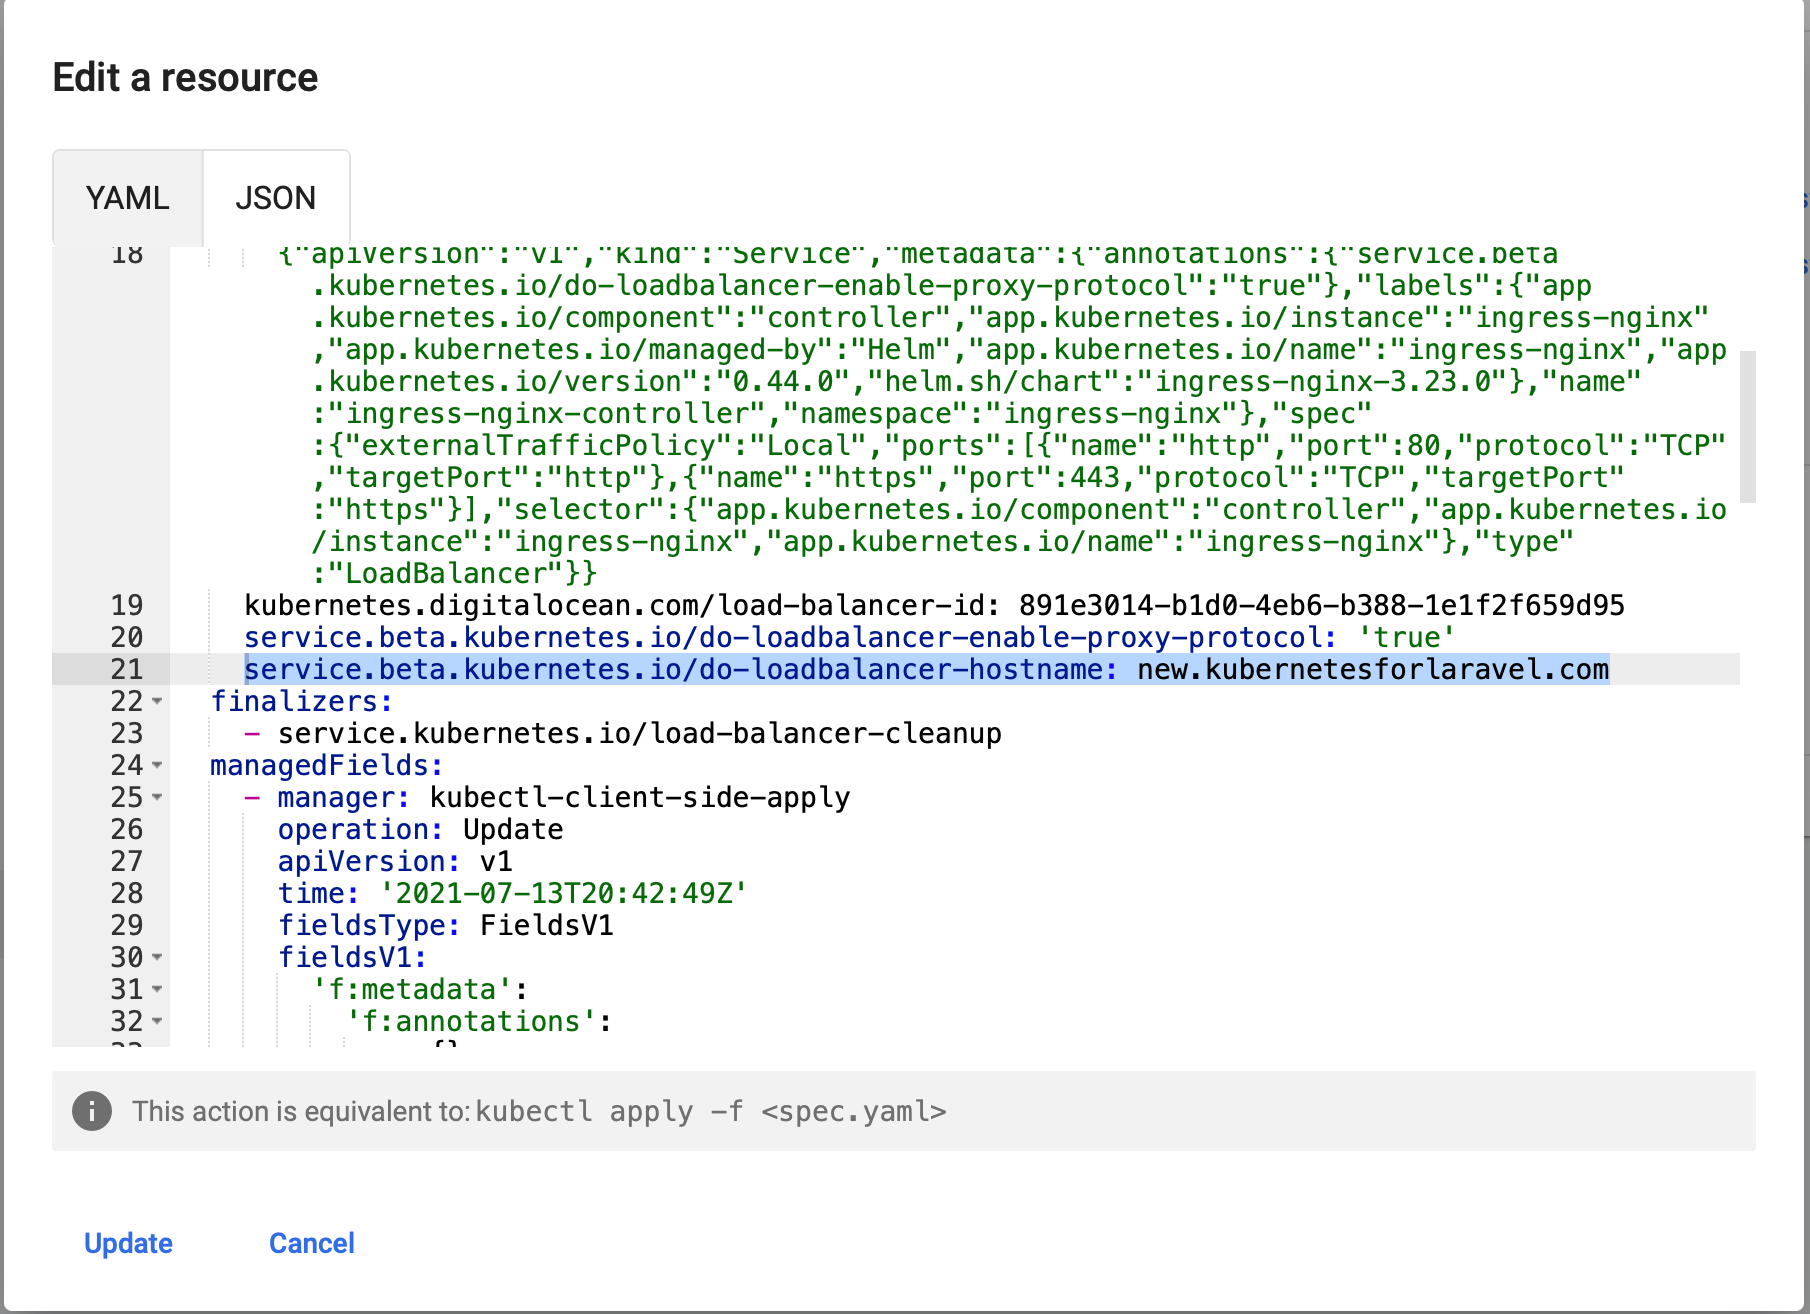
Easiest way to fix this is go to your Kubernetes dashboard, change the namespace to ingress-nginx then go to services.
Edit the ingress-nginx-controller, add under annotations 'service.beta.kubernetes.io/do-loadbalancer-hostname: new.kubernetesforlaravel.com'. Of course substitute your domain here.
Wait a minute then check the SSL certificate on your domain. It should look like this, not like before when it said "Fake certificate".
¶ Switching to Production
Now that we’re confident our setup will acquire the certificate, we switch to the production API.
Apply lets_encrypt_issuer_production then apply lets_encrypt_certificate_production.
Substitute your email and domain in both of these files.
lets_encrypt_issuer_production.yaml :
apiVersion: cert-manager.io/v1
kind: Issuer
metadata:
  name: letsencrypt-production
  namespace: kubernetes-for-laravel
spec:
  acme:
    # Production API
    server: https://acme-v02.api.letsencrypt.org/directory
    email: admin@kubernetesforlaravel.com
    privateKeySecretRef:
      name: account-key-production
    solvers:
      - http01:
          ingress:
            class: nginx
lets_encrypt_certificate_production.yaml :
apiVersion: cert-manager.io/v1
kind: Certificate
metadata:
  name: kubernetes-for-laravel-production
  namespace: kubernetes-for-laravel
spec:
  secretName: kfl-production-certificate
  issuerRef:
    name: letsencrypt-production
  dnsNames:
    - new.kubernetesforlaravel.com
Finally update the ingress to use the production issuer. Change the value for 'cert-manager.io/issuer' to 'letsencrypt-production’. This needs to match the issuerRef that’s set in the certificate yaml file.
Apply the ingress file and the certificate should be valid.
¶ Continuous Integration
Before every deployment, we need to be running our test suite. Deploying untested code is for hobbies only.
We’ll use GitHub actions to run our tests and upload a built image to docker hub. Later on in Continuous Deployment, we’ll use GitHub actions to bring our build live.
First you’ll need to have your code in a GitHub repo : create a .github folder with a workflows folder inside of it. Inside the workflows folder create build.yml.
build.yml :
name: Laravel

on:
  push:
    branches: [ master ]
  pull_request:
    branches: [ master ]

jobs:
  laravel-tests:
    runs-on: ubuntu-latest

    steps:
    - uses: shivammathur/setup-php@15c43e89cdef867065b0213be354c2841860869e
      with:
        php-version: '8.0'
    - uses: actions/checkout@v2 # gets repo
    - name: Copy .env
      run: php -r "file_exists('.env') || copy('.env.example', '.env');" # sets up env
    - name: Install Dependencies
      run: composer install -q --no-ansi --no-interaction --no-scripts --no-progress --prefer-dist
    - name: Generate key
      run: php artisan key:generate
    - name: Directory Permissions
      run: chmod -R 777 storage bootstrap/cache
    - name: Create Database
      run: |
        mkdir -p database
        touch database/database.sqlite
    - name: Execute tests (Unit and Feature tests) via PHPUnit
      env: # overrides env to use sqlite
        DB_CONNECTION: sqlite
        DB_DATABASE: database/database.sqlite
      run: vendor/bin/phpunit

  docker:
    if: github.event_name == 'push' && github.ref == 'refs/heads/master'
    needs: laravel-tests
    runs-on: ubuntu-latest
    steps:
      -
        name: Checkout # gets repo
        uses: actions/checkout@v2
      -
        name: Set up QEMU # needed for docker
        uses: docker/setup-qemu-action@v1
      -
        name: Set up Docker Buildx
        uses: docker/setup-buildx-action@v1
      -
        name: Login to DockerHub
        uses: docker/login-action@v1
        with: # secrets are set in your github repo settings. The tokens can be generated here: https://hub.docker.com/settings/security
          username: ${{ secrets.DOCKERHUB_USERNAME }}
          password: ${{ secrets.DOCKERHUB_TOKEN }}
      -
        name: Build and push app image
        uses: docker/build-push-action@v2
        with:
          context: .
          push: true
          tags: s937717/laravel:latest # this needs to match the repo you created in docker
The laravel-tests job runs the test suite. If it succeeds, the docker job will push the built image to docker.
You’ll need to create an access token for your docker hub account here: https://hub.docker.com/settings/security. Then drop them into the Github Repo’s secrets. The names need to match the names used in the build.yml file.
While you’re in docker, create a repository with a name matching the last line of build.yml. Both private and public repos will work fine.
When you commit this, GitHub will automatically pick it up and run the build steps. Upon completion, your newly built image will be available from docker hub.
Docker hub is how we’ll pull the image to Kubernetes so it’s crucial that this step works
¶ Production Ready Laravel
Our previous PHP deployment had a number of shortcomings including the need to copy the application into a shared directory. We’ll solve that by moving the Nginx container into the same pod as the php container.
Our build steps don’t copy the .env file to the container so we need to setup the environment using a Kubernetes config file.
We’ll also be setting a secret that will later be used as the MySQL password.
¶ Improved PHP Deployment
apiVersion: apps/v1
kind: Deployment
metadata:
  name: php
  labels:
    tier: backend
spec:
  replicas: 1
  selector:
    matchLabels:
      app: nginx
      tier: backend
  template:
    metadata:
      labels:
        app: nginx
        tier: backend
    spec:
      enableServiceLinks: false
      containers:
        - name: php
          image: s937717/laravel
          imagePullPolicy: Always
          env:
            - name: DB_PASSWORD
              valueFrom:
                secretKeyRef:
                  key: password
                  name: mysql-password
          envFrom:
            - configMapRef:
                name: laravel-env
          volumeMounts:
            - name: code
              mountPath: /code
          lifecycle:
            postStart:
              exec:
                command: [ "/bin/sh", "-c", "cp -r /var/www/html/. /code" ]
        - name: nginx
          image: nginx:1.21.0
          ports:
            - containerPort: 80
          volumeMounts:
            - name: config
              mountPath: /etc/nginx/conf.d
            - name: code
              mountPath: /code
      imagePullSecrets:
        - name: regcred
      volumes:
        - name: config
          configMap:
            name: nginx-config
            items:
              - key: config
                path: site.conf
        - name: code
          emptyDir: {}
We’re no longer mounting a code directory. Instead, we run the Nginx container in the same pod as the php container. With bother containers in the same pod, the volume can be declared in the pod as well.
Since we eliminated the shared volume, we won’t have issues scaling between nodes in the cluster. Restarting or adding pods also won’t write files into the filesystem used by other pods.
An emptyDir volume is created and mounted to both containers.
Because Nginx and php are now in the same pod, we don’t need the php service and the Nginx config map needs a small change. Change the fastcgi_pass from php:9000 to localhost:9000.
The image pull policy needs to be set to Always. That makes Kubernetes check the docker repository for the image.
We’re also adding imagePullSecrets to give access to the private docker repo. You’ll need to login to docker then share the secret to your Kubernetes cluster. https://kubernetes.io/docs/tasks/configure-pod-container/pull-image-private-registry/#log-in-to-docker
The guide here is perfectly adequate. Use the docker login portion and then "Create a secret based on existing Docker credentials".
apiVersion: v1
kind: ConfigMap
metadata:
  name: nginx-config
  namespace: kubernetes-for-laravel
  labels:
    tier: backend
data:
  config : |
    server {
      index index.php index.html;
      error_log  /var/log/nginx/error.log;
      access_log /var/log/nginx/access.log;
      root /code/public;
      add_header X-Frame-Options "SAMEORIGIN";
      add_header X-XSS-Protection "1; mode=block";
      add_header X-Content-Type-Options "nosniff";
      location / {
          try_files $uri $uri/ /index.php?$query_string;
      }
      location ~ \.php$ {
          try_files $uri =404;
          fastcgi_split_path_info ^(.+\.php)(/.+)$;
          fastcgi_pass localhost:9000;
          fastcgi_index index.php;
          include fastcgi_params;
          fastcgi_param SCRIPT_FILENAME $document_root$fastcgi_script_name;
          fastcgi_param PATH_INFO $fastcgi_path_info;
        }
    }
Under env in the php_deployment we load a secret named password from the file named mysql-password into the environment variable DB_PASSWORD, let's create that.
apiVersion: v1
kind: Secret
metadata:
name: mysql-password
namespace: kubernetes-for-laravel
type: Opaque
stringData:
password: password
Apply the mysql_password.yaml file after setting the value of password to your liking.
Finally we have envFrom which references the configMap named laravel-env.
apiVersion: v1
kind: ConfigMap
metadata:
name: laravel-env
namespace: kubernetes-for-laravel
data:
APP_DEBUG: "true"
APP_ENV: local
APP_KEY: base64:cRTX45XeMs1fK5vuSqO9okIlF0zDEv7vHBVIhxR68Mc=
APP_LOG_LEVEL: debug
APP_NAME: "Laravel"
APP_URL: https://new.kubernetesforlaravel.com
BROADCAST_DRIVER: pusher
CACHE_DRIVER: redis
QUEUE_CONNECTION: redis
SESSION_DRIVER: redis
DB_CONNECTION: mysql
DB_DATABASE: laravel
DB_HOST: mysql
# DB_PASSWORD: password # get password from secret
DB_USERNAME: root
DB_PORT: "3306"
REDIS_HOST: redis
REDIS_PORT: "6379"
LOG_CHANNEL: "stack"
This file is a lot like a typical .env file except we’re leaving out any secrets.
Run :
apply -f php_env_configmap.yaml
and then we’re ready to deploy the php and Nginx containers.
Run :
apply -f php_deployment.yaml
apply -f nginx_service.yaml
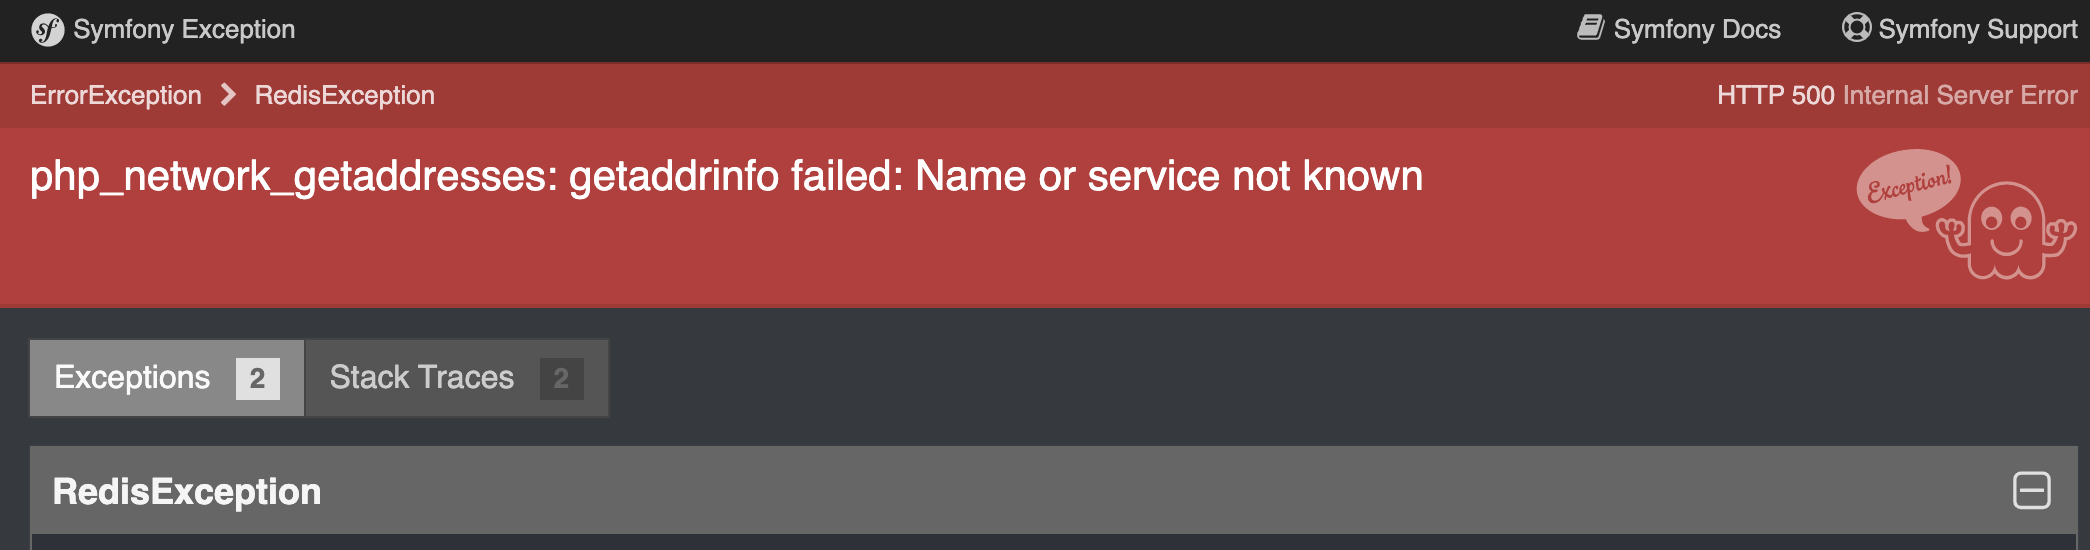
Once all the containers are ready, browse to your domain and you should see a Laravel error page. We configured Laravel to use redis for cache but redis isn’t setup yet. We’ll do that next.
¶ Accessing the container with SSH
You might need to access one of your containers for debugging. Exec from Digital Ocean’s Kubernetes dashboard is unsupported.
You can use kubectl to access the containers.
kubectl exec POD-NAME —container=nginx -i -t bash
It’s useful for debugging but in general, don’t make changes because they will be lost if the container is deployed.
¶ Setting up Redis
Redis needs a persistent volume to restore data from any time it restarts.
Create a persistent volume claim named redis-pv.
apiVersion: v1
kind: PersistentVolumeClaim
metadata:
  name: redis-pv
  namespace: kubernetes-for-laravel
spec:
  accessModes:
    - ReadWriteOnce
  resources:
    requests:
      storage: 1Gi
  storageClassName: do-block-storage
Run :
apply -f redis_volume.yaml
Now create the Redis StatefulSet. When data consistency is important StatefulSets offer some benefits over Deployments.
apiVersion: apps/v1
kind: StatefulSet
metadata:
  name: redis
  namespace: kubernetes-for-laravel
  labels:
    tier: backend
spec:
  replicas: 1
  serviceName: redis
  selector:
    matchLabels:
      app: redis
      tier: backend
  template:
    metadata:
      labels:
        app: redis
        tier: backend
    spec:
      volumes:
        - name: redis-pv
          persistentVolumeClaim:
            claimName: redis-pv
      containers:
        - name: redis
          image: redis:6.2.4
          args: ["--appendonly", "yes", "--save", "30", "100"]
          ports:
            - containerPort: 6379
          volumeMounts:
            - mountPath: "/data"
              name: redis-pv
Run :
apply -f redis_deployment.yaml
Finally create a service.
apiVersion: v1
kind: Service
metadata:
  name: redis
  namespace: kubernetes-for-laravel
  labels:
    tier: backend
spec:
  selector:
    app: redis
    tier: backend
  ports:
    - protocol: TCP
      port: 6379
Just a simple service exposing the port of the StatefulSet to the network.
Run :
apply -f redis_service.yaml
and Redis should be ready to go.
Browse to the URL and you should get the Laravel start page. No more Redis error.
¶ MySQL
MySQL needs persistent storage so create a volume for it.
apiVersion: v1
kind: PersistentVolumeClaim
metadata:
name: mysql-pv-claim
namespace: kubernetes-for-laravel
spec:
accessModes:
    - ReadWriteOnce
resources:
requests:
storage: 2Gi
storageClassName: do-block-storage
Nothing special going on here, just run :
apply -f mysql_storage.yaml
apiVersion: apps/v1
kind: StatefulSet
metadata:
name: mysql
namespace: kubernetes-for-laravel
labels:
tier: backend
spec:
replicas: 1
serviceName: 'mysql'
selector:
matchLabels:
app: mysql
tier: backend
template:
metadata:
labels:
app: mysql
tier: backend
spec:
volumes:
        - name: mysql
persistentVolumeClaim:
claimName: mysql-pv-claim
containers:
        - name: mysql
image: mysql:8.0
env:
            - name: MYSQL_ROOT_PASSWORD
valueFrom:
secretKeyRef:
key: password
name: mysql-password
            - name: MYSQL_DATABASE
valueFrom:
configMapKeyRef:
name: laravel-env
key: DB_DATABASE
ports:
            - containerPort: 3306
volumeMounts:
            - name: mysql
mountPath: /var/lib/mysql
We mount our volume to /var/lib/mysql which is where MySQL stores its data. The container uses environment variables during setup to set the password and create a database if it doesn’t exist.
The password comes from the secret we created earlier and the database name from the env config map. Easy way to keep everything synchronized.
Run :
apply -f mysql_deployment.yaml
Finally we need the service. Again, nothing special going on, just an exposed port.
apiVersion: v1
kind: Service
metadata:
  name: mysql
  namespace: kubernetes-for-laravel
  labels:
    tier: backend
spec:
  selector:
    app: mysql
    tier: backend
  ports:
    - protocol: TCP
      port: 3306
Run :
apply -f mysql_service.yaml
Try any database request now, Laravel is about to connect to MySQL but we forgot to migrate our database.
Go back to our php deployment and let’s handle migrations. Change the post start exec command to [ "/bin/sh", "-c", "cp -r /var/www/html/. /code && php artisan migrate --force" ]
This will run migration after every deployment.
Apply the modified php deployment then try your database request again.
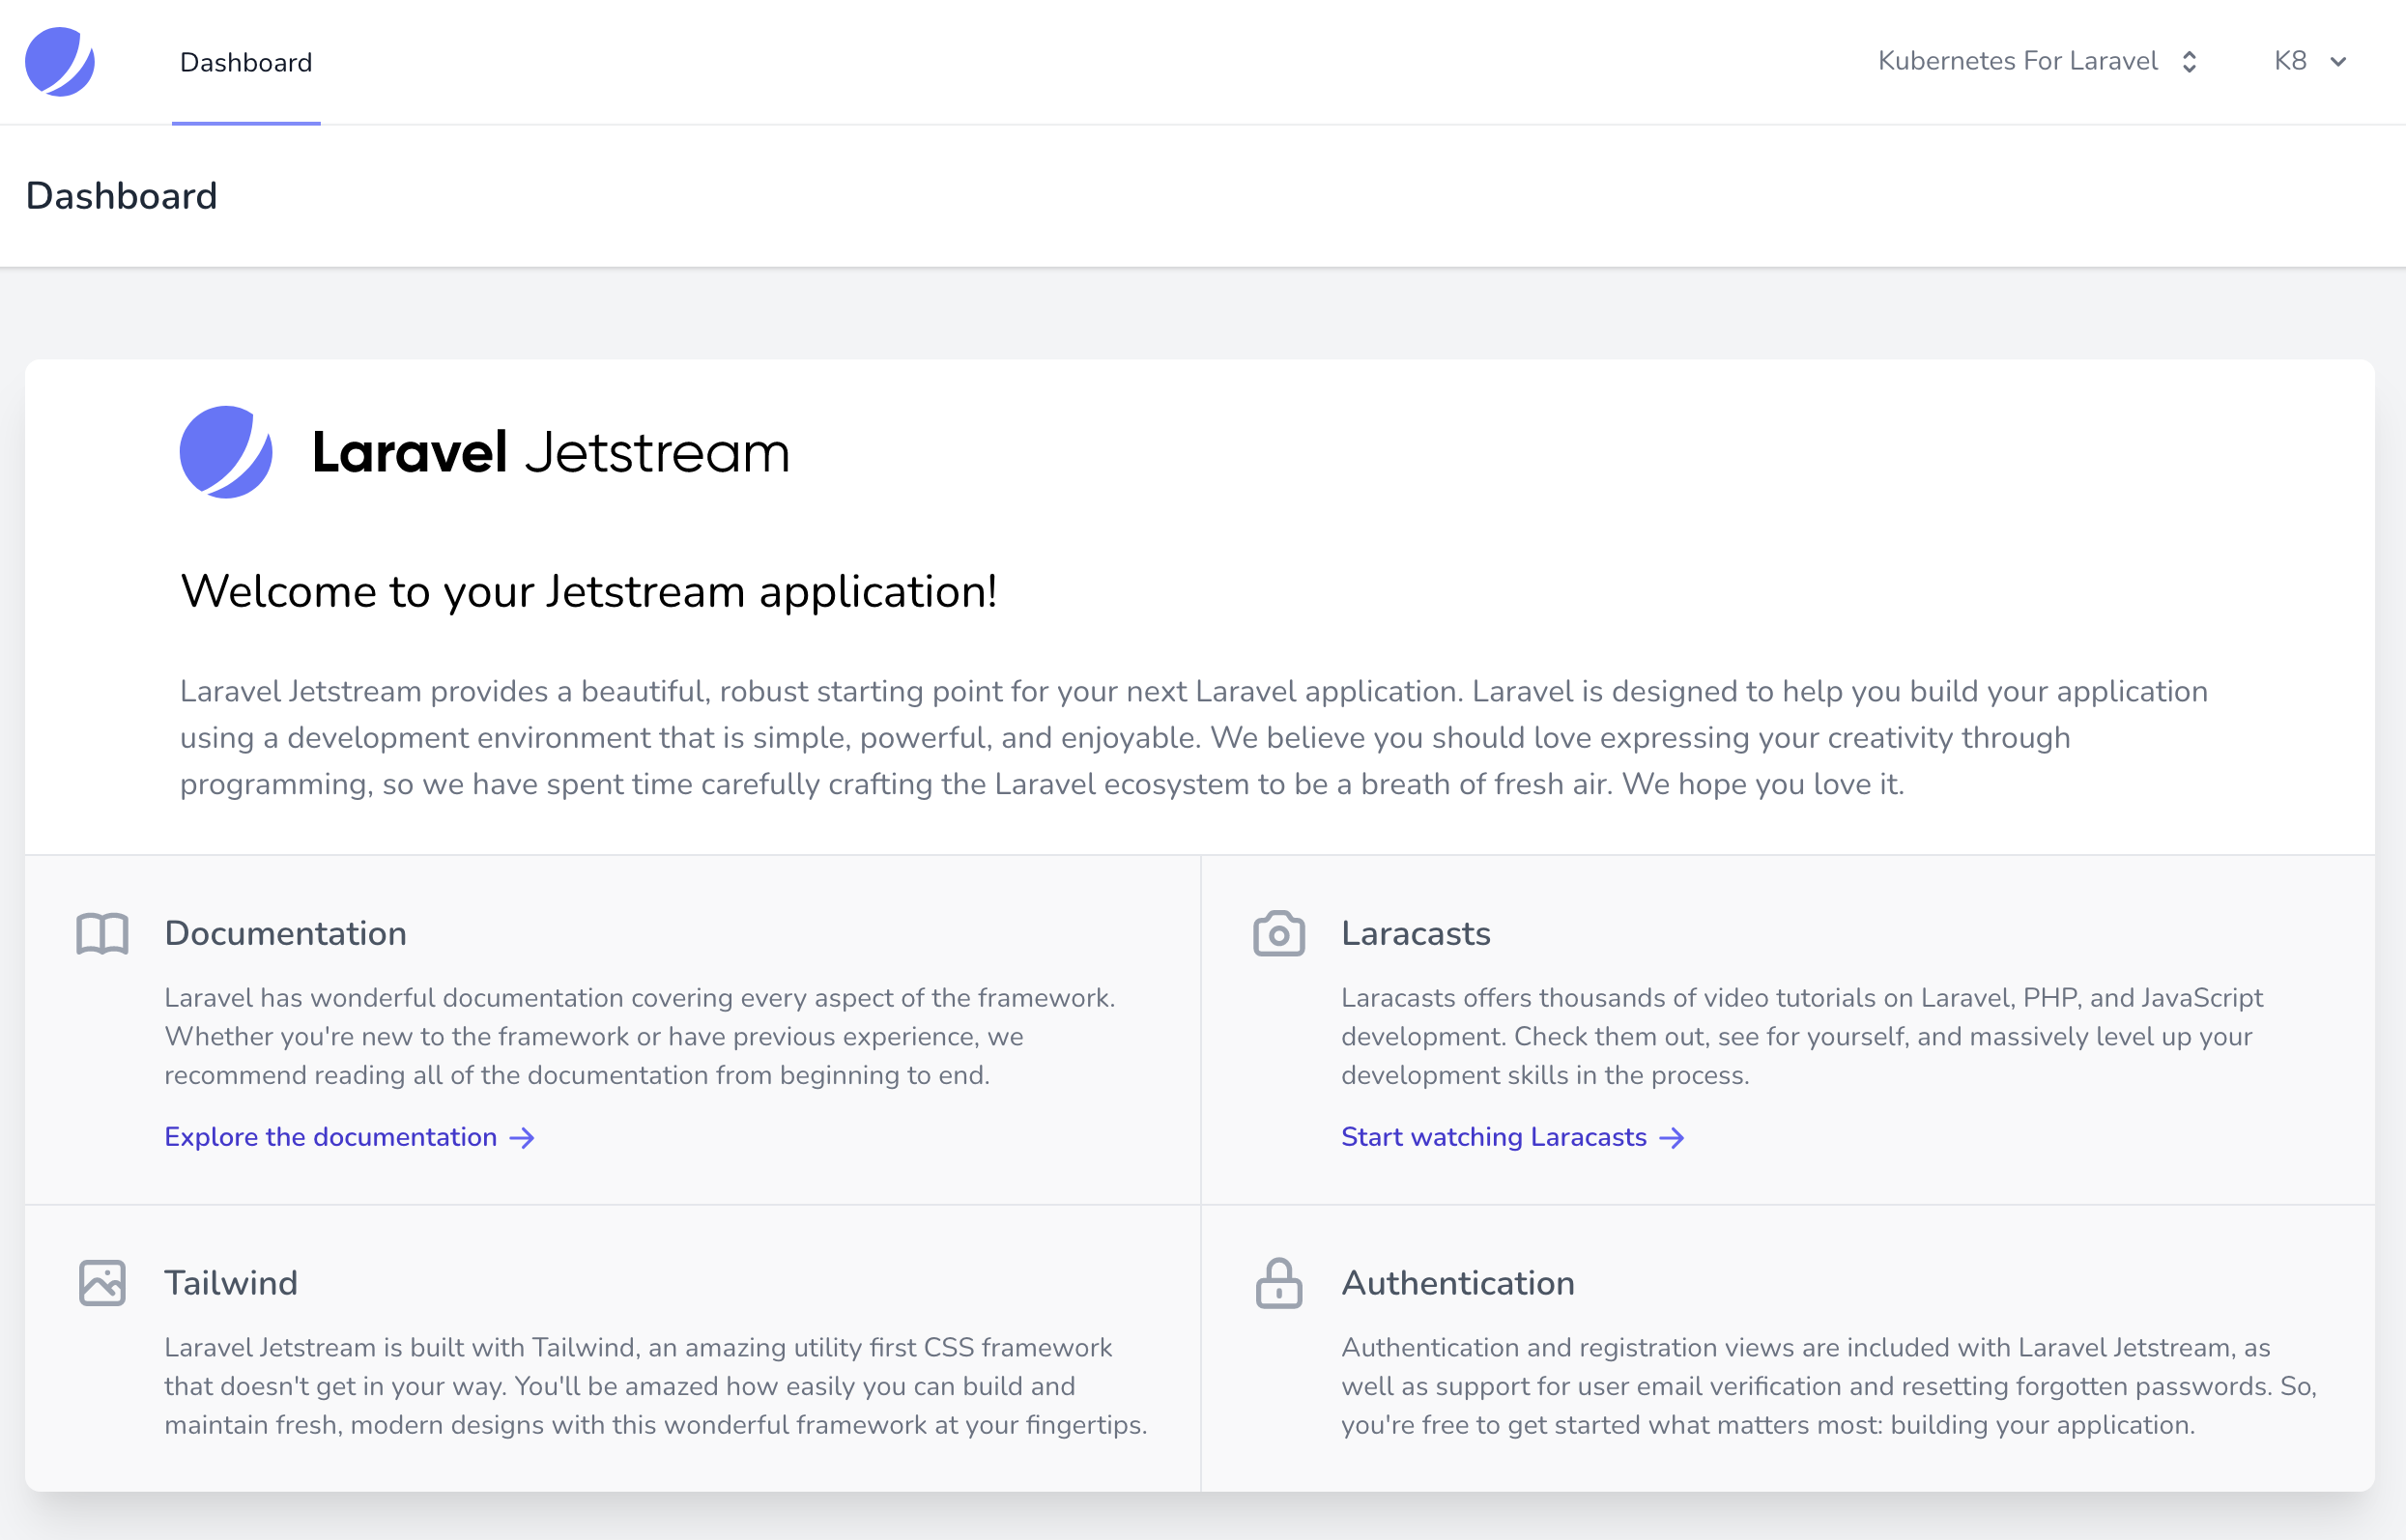
I used the Jetstream starter kit. Registering and logging in is working perfectly.
For more on read scaling MySQL, see https://kubernetes.io/docs/tasks/run-application/run-replicated-stateful-application/
Write scaling is a different challenge. Let me know if you're interested in that too.
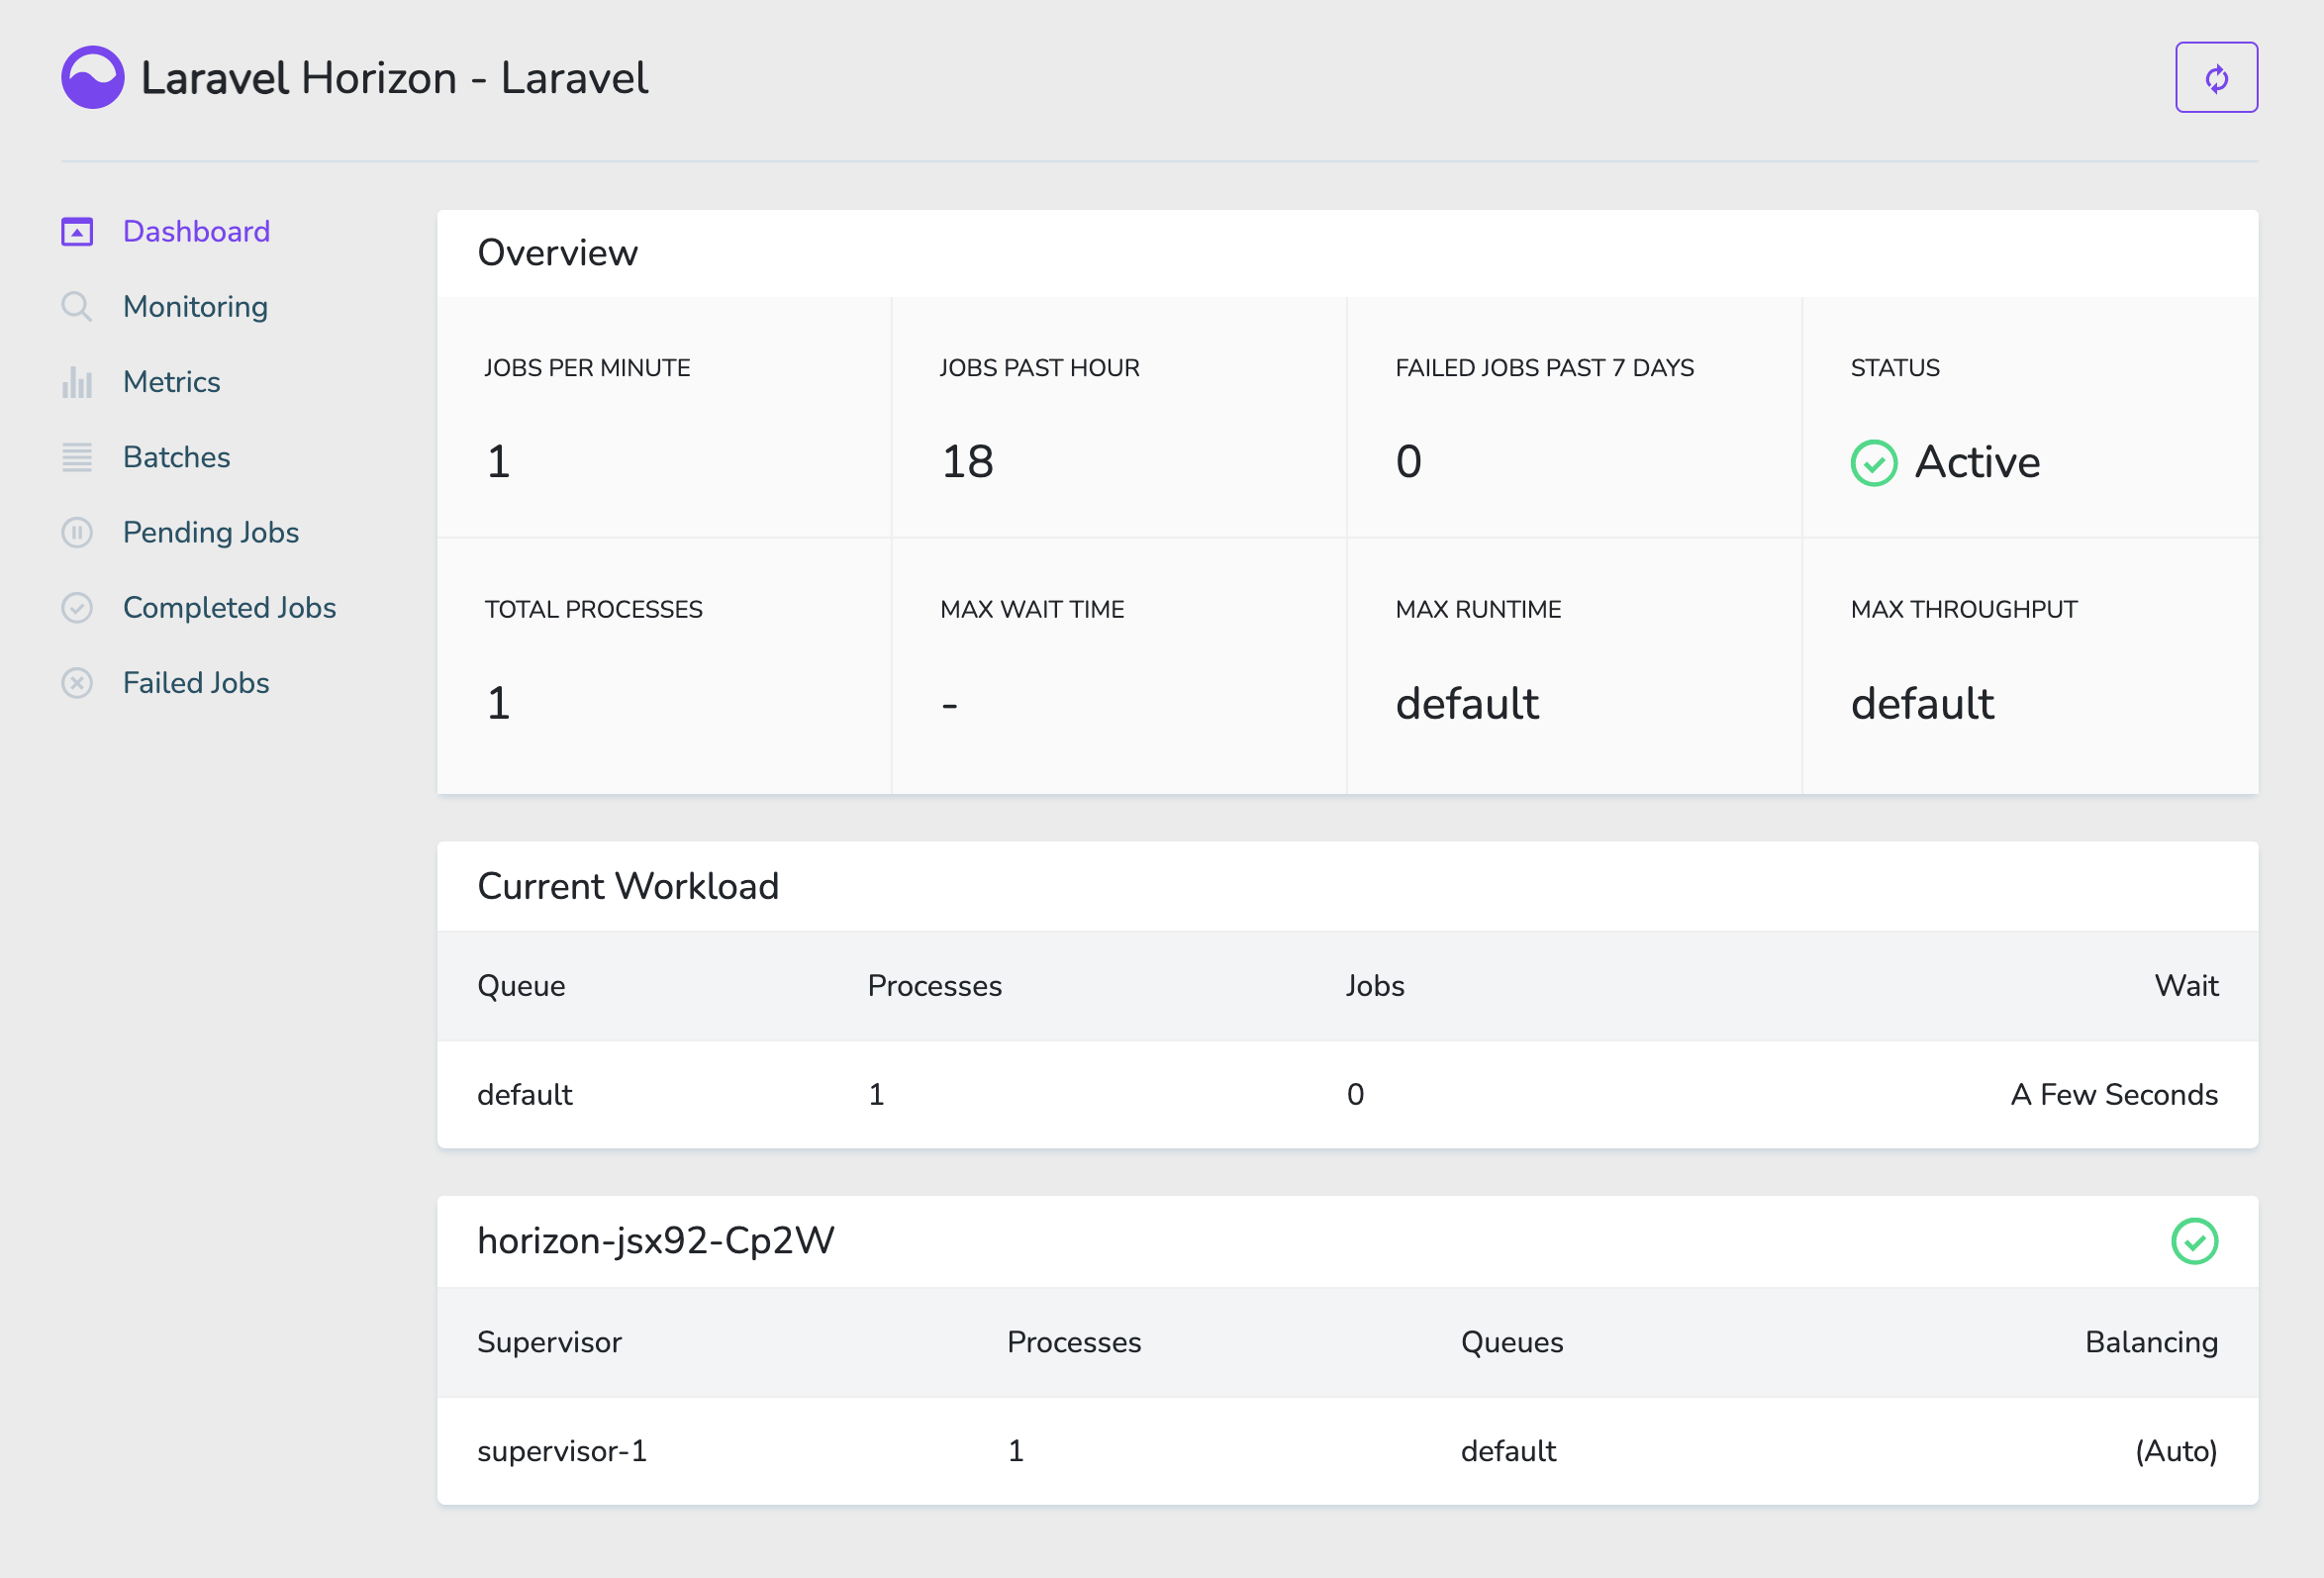
¶ Horizon
Laravel queues are a big part of most larger applications. And Horizon is the best way to run them.
Before getting started, make sure you’ve installed Horizon into your project.
We won’t need to use Supervisor or any other process monitor because Kubernetes can do it for us.
apiVersion: batch/v1
kind: Job
metadata:
  name: horizon
  namespace: kubernetes-for-laravel
  labels:
    tier: backend
spec:
  parallelism: 1 # used to scale processes
  template:
    metadata:
      labels:
        app: horizon
        tier: backend
    spec:
      enableServiceLinks: false
      restartPolicy: OnFailure
      containers:
        - name: horizon
          image: s937717/laravel
          imagePullPolicy: Always
          env:
            - name: DB_PASSWORD
              valueFrom:
                secretKeyRef:
                  key: password
                  name: mysql-password
          envFrom:
            - configMapRef:
                name: laravel-env
          command: [ "/bin/sh", "-c", "php /var/www/html/artisan horizon" ]
      imagePullSecrets:
        - name: regcred
We can scale the number of processes run by increasing the parallelism of the job.
The command is run to start horizon. Then Kubernetes monitors the job until it finishes.
Run :
kubectl -f horizon_deployment.yaml
The worker should come up in the Horizon dashboard shortly.

¶ Cron Jobs
Kubernetes has a cron job runner built in. Schedule it to run Laravel’s schedule:run command every minute. That’s all there is to it.
apiVersion: batch/v1
kind: CronJob
metadata:
  name: laravel-cron
  namespace: kubernetes-for-laravel
  labels:
    tier: backend
spec:
  schedule: "* * * * *"
  jobTemplate:
    metadata:
      labels:
        app: laravel-cron
        tier: backend
    spec:
      template:
        spec:
          enableServiceLinks: false
          restartPolicy: OnFailure
          containers:
            - name: laravel-cron
              image: s937717/laravel
              imagePullPolicy: Always
              command:
                - /bin/sh
                - -c
                - php /var/www/html/artisan schedule:run
              env:
                - name: DB_PASSWORD
                  valueFrom:
                    secretKeyRef:
                      key: password
                      name: mysql-password
              envFrom:
                  - configMapRef:
                      name: laravel-env
          imagePullSecrets:
            - name: regcred
Run :
apply -f laravel_cronjob.yaml
You can view the output of the command by going to the pod in Kubernete’s dashboard then clicking view log at the top.

¶ Continuous Deployment
Our full application should be running now but we need to be able to push updates. We’ll use Github actions for this. Add another job to the end build.yml file :
name: Laravel
on:
push:
branches: [ master ]
pull_request:
branches: [ master ]
jobs:
laravel-tests:
runs-on: ubuntu-latest
steps:
    - uses: shivammathur/setup-php@15c43e89cdef867065b0213be354c2841860869e
with:
php-version: '8.0'
    - uses: actions/checkout@v2 # gets repo
    - name: Copy .env
run: php -r "file_exists('.env') || copy('.env.example', '.env');" # sets up env
    - name: Install Dependencies
run: composer install -q --no-ansi --no-interaction --no-scripts --no-progress --prefer-dist
    - name: Generate key
run: php artisan key:generate
    - name: Directory Permissions
run: chmod -R 777 storage bootstrap/cache
    - name: Create Database
run: |
        mkdir -p database
        touch database/database.sqlite
    - name: Execute tests (Unit and Feature tests) via PHPUnit
env: # overrides env to use sqlite
DB_CONNECTION: sqlite
DB_DATABASE: database/database.sqlite
run: vendor/bin/phpunit
docker:
if: github.event_name == 'push' && github.ref == 'refs/heads/master'
needs: laravel-tests
runs-on: ubuntu-latest
steps:
      -
name: Checkout # gets repo
uses: actions/checkout@v2
      -
name: Set up QEMU # needed for docker
uses: docker/setup-qemu-action@v1
      -
name: Set up Docker Buildx
uses: docker/setup-buildx-action@v1
      -
name: Login to DockerHub
uses: docker/login-action@v1
with: # secrets are set in your github repo settings. The tokens can be generated here: https://hub.docker.com/settings/security
username: ${{ secrets.DOCKERHUB_USERNAME }}
password: ${{ secrets.DOCKERHUB_TOKEN }}
      -
name: Build and push app image
uses: docker/build-push-action@v2
with:
context: .
push: true
tags: s937717/laravel:latest # this needs to match the repo you created in docker
digitalOcean-deploy:
if: github.event_name == 'push' && github.ref == 'refs/heads/master'
needs: docker
runs-on: ubuntu-latest
steps:
      - name: Checkout code
uses: actions/checkout@v2
      - name: Install doctl
uses: digitalocean/action-doctl@v2
with:
token: ${{ secrets.DIGITALOCEAN_ACCESS_TOKEN }}
      - name: Save DigitalOcean kubeconfig
run: doctl kubernetes cluster kubeconfig save new-kubernetes-for-laravel # cluster name
      - name: Rollout Update
run: kubectl rollout restart deployment php --namespace=kubernetes-for-laravel
      - name: Restart Horizon
run: kubectl delete job/horizon --namespace=kubernetes-for-laravel && kubectl apply --kubeconfig=/home/runner/.kube/config --filename=${GITHUB_WORKSPACE}/k8s/horizon_deployment.yaml
      - name: Restart Cronjob
run: kubectl delete cronjob/laravel-cron --namespace=kubernetes-for-laravel && kubectl apply --kubeconfig=/home/runner/.kube/config --filename=${GITHUB_WORKSPACE}/k8s/laravel_cronjob.yaml
The first step checks out the code, we need to access our kubernetes deployment scripts.
Next we setup the Digital Ocean API. Go to Digital Ocean then API and generate a new Personal Access Token. We need to add this token to a secret in Github just like we did with Docker.
Name the secret ‘DIGITALOCEAN_ACCESS_TOKEN’ to match what’s used in the build.yml.
On the save digital ocean kubeconfig step, we need to set the cluster name.
Set the namespace to match. Then set the path for horizon_deployment.yaml and laravel_cronjob.yaml so we’re able to restart those tasks from Github.
This final step will only run on a successful build so you’ll never deploy code that didn’t pass the tests.
¶ Log Aggregation
For logging we’ll use https://papertrailapp.com/. The search it has is excellent. If you don’t have an account, use my referral link and you’ll get extra storage: https://papertrailapp.com/?thank=dbfc09
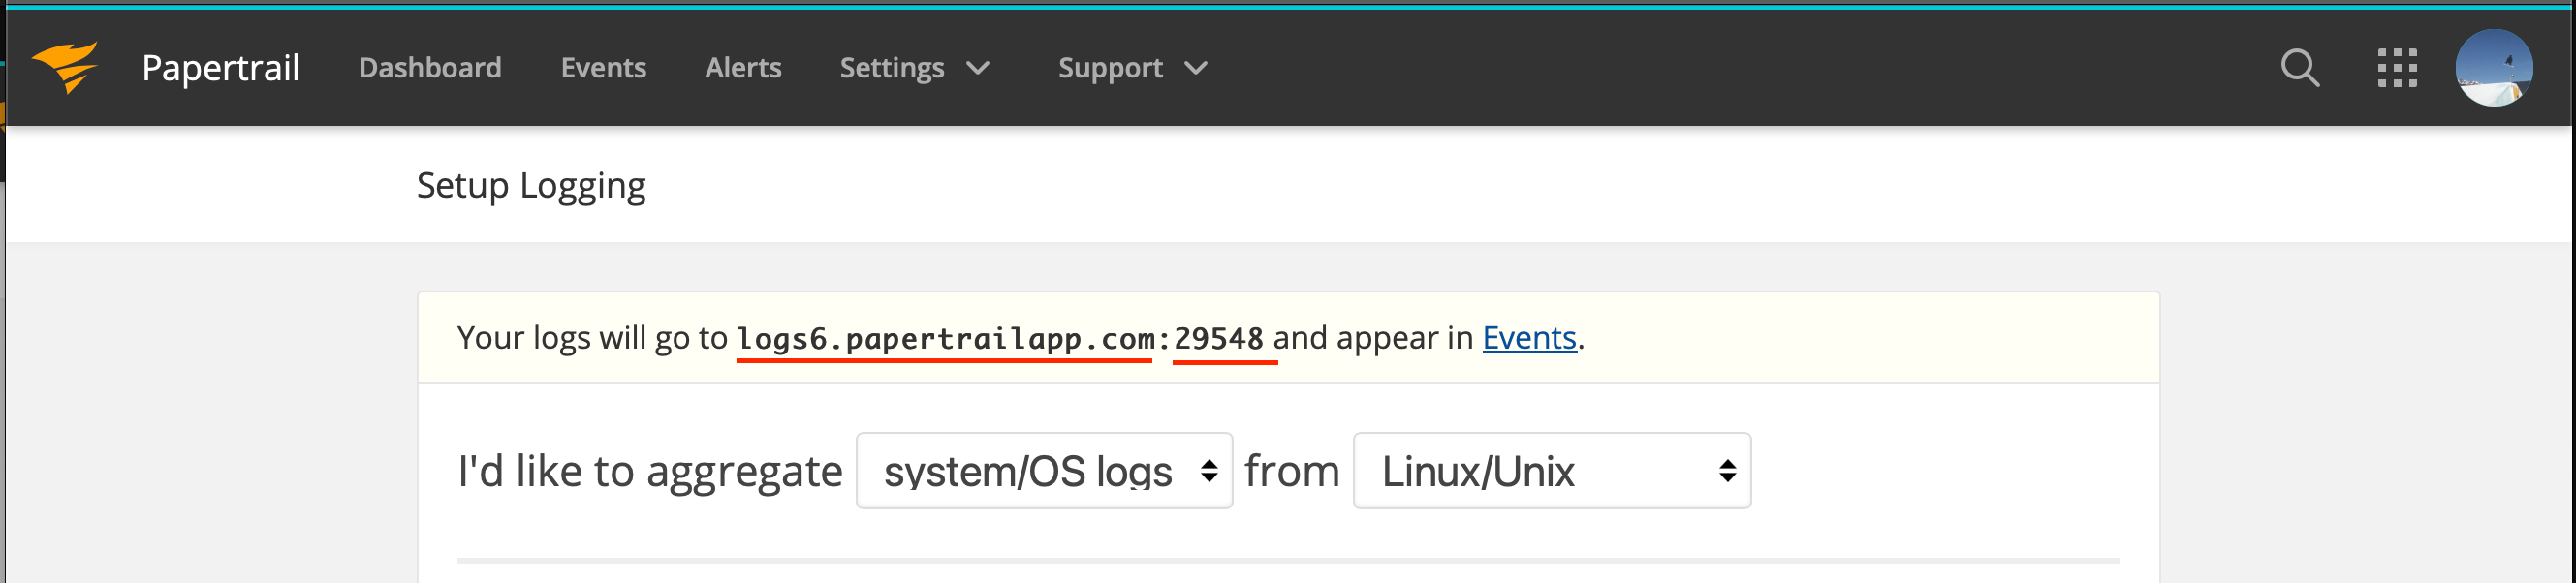
Once you get to the setup page, you’ll need the URL and the port that I underlined.
Add LOG_CHANNEL, PAPERTRAIL_URL, and PAPERTRAIL_PORT to the php_env_configmap.yaml.
Apply it, restart the deployment by running :
kubectl rollout restart deployment php --namespace=kubernetes-for-laravel
and logging will start up.
Because we’re sharing the env configmap between all our containers, this setting will automatically apply to Cron and Horizon too.